Tuesday, October 26, 2021

Tickled Tuesday - Masking

 I always wondered how people could put together a scenery on a card and have everything in place so that it looked like the trees were in the background with the focus of the card on the forefront and none of the stamps overlapped.  The answer I found to my question is in masking!  


What you will need for this project is:
  • Evening Evergreen 8-1/2" x 5-1/2" Cardstock - scored at 4-1/4"
  • (2) 5-1/4" x 4" Basic White Cardstock
  • Peaceful Cabin Stamp Set
  • Black Memento Ink Pad
  • Evening Evergreen Stampin Ink Pad
  • Cajun Craze Stampin Ink Pad
  • Balmy Blue Stampin Ink Pad
  • Layering Circle Dies
  • Blending Brushes
  • Wink of Stella
  • Post-It Notes

First stamp the sentiment of your choice on one of the Basic White cards and adhere that to the inside of your card. Set aside.

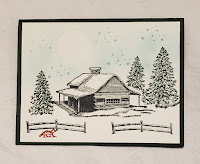
Take your second Basic White card.  I stamped my cabin in the center, lower-mid area, so that I would have room to add a moon.  I then stamped my fence and my fox.

I took some post-it notes, stamped the cabin on the post - it note so that the top of my cabin was where the sticky part would be on the other side of the note.  I then cut out the image and place it on top of my stamped image.  I also cut a circle out of the post it pad, again at the top of the note pad so there was some sticky on the opposite side.  I used the smallest circle from our Layering Circle Dies.  I placed the circle above my cabin.

I then stamped my evergreen trees to the sides of the cabin, stamping a bit over the post-it note.  

I took the snowflake stamp and added some snowflakes, and then took my blending brush--lightly brushing the balmy blue ink over the top and around my images.  

I removed my post it notes and there I found the scenery I was hoping to create!

I added a special effect by taking my Wink of Stella and placing some over the rooftop of my cabin to create some glistening snow.

Check out my video to see how it's done!


Product List

Monday, October 25, 2021

Simple Sunday - Gift Box

 Using Stampin' Up's packaging options provide some great gift giving opportunities.  Today we are going to take a look at making a gift box.  I made one for Christmas, but these little boxes can be used for any occasion and can bring great joy to any receiver!

I used a Scalloped Kraft Treat Box, found on page 137 of the 2021-2022 Annual Catalog.  You won't need any wrapping paper for this, as the box itself is decorative enough.  I also went to the Dollar Store to find some shredded paper to insert into the box for filling.

Options for gifting are:

  • Gift Cards
  • Chocolate
  • Jewelry

This is what I used to make my gift box:
  • 1 Scalloped Kraft Treat Box
  • 32" Real Red Ribbon
  • Tailored Tag Punch
  • Poinsettia Dies
  • Red Rhinestone Basic Jewels
  • Evening Evergreen Stamp Ink Pad
  • Stampin' Dimensionals
  • Mini Stampin Dimensionals

How to assemble:
  1. Cut out the Poinsettia Dies with our Stampin' Up! Cut and Emboss Machine.  Place three Red Rhinestone Basic Jewels on the center of the smallest poinsettia petal.  Assemble the petals together using the Mini Stampin Dimensionals in the center of each poinsettia petal. Adhere these with the dimensionals to the green leaf that is behind your pointsettia. 
  2. Punch a tag with the Tailored Tag Punch. 
  3. Stamp your sentiment with the Evening Evergreen Stamp Ink Pad
  4. Wrap the Real Red Ribbon on all four sides of the box to secure it all together.  Tie with a knot on the top.
  5. With the larger Stampin' Dimensionals, adhere the leaf/poinsettia over the knotted ribbon.
  6. Adhere the tag with a Glue Dot.
  7. Trim the ends of the ribbon.

Product List


Check out the video of this presentation!


Tuesday, October 12, 2021

Tickled Tuesday -- the Kissing Technique

 No!  It's not kissing like we know it.  However, they do say opposites attract and I took two stamps that are very different from each other to do this card.

The colors used are:

  • The base of the card is Pacific Point, 5-1/2" x 4-1/4"
  • The middle layer is Pattern Party Designer Series Paper 5-1/4" x 4
  • The top layer, basic white, 5" x 3-3/4"
  • The inside of the card, basic white, 5-1/4" x 4"

The stamp ink pads used are Daffodil Delight, Pear Pizzaz, Highland Heather and Black Memento
The sentiment came from the Many Messages stamp set, found on page 42 of the May 2001-April 2001 Annual catalog.

The kissing technique is sooo easy to do!  I used stamp sets Textures and Frames (photopolymer stamps) and Gorgeous Leaves (red cling stamps).  Pictured here are the sets with the specific stamp that I used to do this card.

I took the stamp from the Gorgeous Leaves and used that as my textured stamp.  I would ink that up with the color of choice.  Then I took from the Textures and Frames set, the solid circle.  I pressed the circle against the texture (the two stamps kissed) and I got a completely different look.  The following picture shows the circle as the solid it as and then what it looks like after the stamps have kissed.


I then assembled the card to get a nice, fun birthday card!


Watch how it's done by looking at this 10 minute video!


Template #6

 This easy card came from Stamping with Amy K.   It's so quick to put together.  You will absolutely love the quick and easy approach! ...