Thursday, February 24, 2022

Easter is Coming!

Easter is less than a month away and I wonder if you send out Easter cards to your family and friends.  Here's a very simple idea for a card, should you like to create your own!  


Using our Daffodil Daydream bundle, (stamp set and dies), I stamped two 1/2" strips at 5-1/2" long, with the border.  I then colored the borders with my blending pens to create a stained-glass window effect.  I also used one of the daffodil stamps, colored that with my daffodil delight and old olive blending pens.  Then I cut those out with the matching die cut found in the daffodil die set.  

I chose the polished pink cardstock as my base and cut out a 5-1/2" by 8-1/2" sheet of paper, scoring and folding it at 4-1/4".  I cut one 5-1/4" x 4" of basic white to use inside the card, to write my message.  I took my Stampin' Seal and glued it inside of my card.  Using my Mini Emboss and Cut machine, I then chose and cut a piece, (the same size as the basic white), of the Daffodil Afternoon Designer Series Paper found in our Sale -A-Bration catalog.  I used that as my layering piece, adhering that on the front side of my card. I then glued my borders on either end of the card, on top of the layering DSP.  With my Stampin' Dimensionals I placed the flowers that I had cut out in the middle, off to the right side a bit.  I took some Pale Papaya cardstock I punched and oval with my oval punch and stamped the sentiment, in Memento Black, on top of that.  I also added that to the card, with dimensionals to the lower left of the flowers.

And that was it!  Very simple, very pretty card.  Aside from the Designer Series Paper, if you are interested in any of these products you can order them from our Mini January - June 2022, and our Annual catalogs. The Daffodil Afternoon DSP is only available until February 28th, through our Sale - A Bration Catalog.  You will need to place an order of $50.00 in order to get that paper free.  

Try it out!  You won't be disappointed, and you'll be surprised just how fun it is to put it together!  Happy Early Easter, Everyone!

Wednesday, February 16, 2022


Stampin' Up! has brought out a new suite collection called All Together.  It comes with our All Together Designer Series Paper, Here Together Stamp Set, Here for You Dies, and Blending Pens.  This set is a diversified, all-inclusive suite. It has become a big hit!


You can purchase items from this suite until May 2nd.  However. these have been so popular that the blending pens are presently out of stock and due to the global shipping challenges, it will be a while before we are able to order them.  I will keep you informed when they are available again.  The good news is that the pens will be added to our new Annual Catalog, that will come out this June.  All of the other items in this suite are available, should you choose to get a jump on it.


Product List

Wednesday, February 2, 2022

VALENTINE CARDS

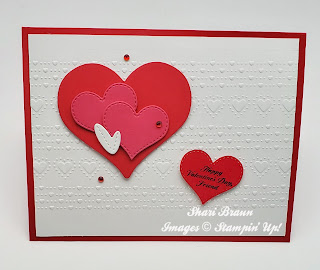
For the month of February, I am focusing on Valentine cards.  In this post I will share some cards I have personally put together.  One was a card just for a friend, the other a card for someone very special.  They are very similar, yet they look very different.  The colors I used were real red, basic white, melon mambo, and garden green.  


I used the real red cardstock as the base of my cards, 5-1/2" x 8-1/2" in size.  Then I cut out two basic white cards, 5-1/4" x 4" in size for each card.  I embossed two of the basic white cards with the Dotty Hearts Embossing Folders--two different designs.  I used one design for one card and the other for my second card.  


The hearts and flowers that I added to my cards were from the Bouquet of Love Dies.  The leaves came from our Flowers of Home Dies set.  It was fun to just arrange the cut outs to any design I wanted to.  I used dimensionals to stack the hearts on top of each other as well.  Both of my stamped sentiments came from our Love and Happiness Stamp set. One sentiment was stamped on a heart cut out and the other I used some scrap paper to make a simple banner/flag.

I topped them off with some simple embellishments, the pink jewels from our 2021-2023 In Color Jewels, and our Red Rhinestone Basic Jewels.

The next few posts I will show you what fun options were found with our February Paper Pumpkin!  Stay tuned!


Product List

Friday, January 21, 2022

TEAM CHALLENGE -- SKETCH CARD

 My team received a sketch and we were challenged to make a card like the picture we were given.  The sketch was a white square on a background with a flag strip behind it.  There was a bow added to it as well.  I came up with a design in two different forms -- a 4" square card and a horizontal card.    

I started by taking two of the stamps from our Friendly Hello Stamp Set, and I stamped those on basic white.  I took my blender pens (not to be confused with the blending pens) and dipped the tips into the stamp pads to color my stamped images.  I used the Stamparatus to stamp both stamps with the Tuxedo Black Momento ink pad. 

Next, I chose one of the Designer Sheets from our Friendly Hello Bundle and made a 1-1/2" flag strip.  I glued the strip on the shaded spruce card stock.  I added the basic white card that I stamped. On the 4" square card I added a Pool Party 3/8" Stripped Grosgrain Ribbon.  I used the white and tan twine to make a bow for the horizontal card.  

Monday, November 29, 2021

Bay Window Fun Fold

 My second post is in regards to the Bay Window Fun Fold Card.  This one took a bit to put together, but once it was done, I absolutely loved it!  It is so cool!


To make this you will need:

  • Card base of 4-1/4 x 11, scored on the long side at 3/8, 1-7/8, 3-5/8, 5-1/8, 5-1/2.  I used Basic Gray
  • You will need some Designer Series Paper, 4-1/8 x 6 - cut 1-5/8 off the end.  Then cut in the same direction pieces that measure 1-3/8, 1-5/8, 1-3/8 (x 4-1/8 in height)
  • Then choose a second DSP where you will cut 1/4 x 4-1/8.  
  • 3-1/2 x 4-1/8 of white cardstock
  • scrap paper for sentiment

I chose the Peaceful Place DSP for both my directional pieces and patterned pieces.

  • The 1-5/8 X 4-1/8 piece that was cut off the end of the DSP is adhered to the inside of the card, along the end.  
  • Cardstock choice cut at 3-1/2 by 4-1/8 is adhered on the inside of the card to write your note.  I also had cut out one of the cabin images and adhered that to the note card.
  • Adhere the 1/4 strips to both sides of the outside of the card (inside the 3/8ths score line).  Then take your directional DSP pieces and place them within the score lines on the top/outside of the card.  

Take your sentiment and place it in the middle of your card.  I chose one of the seasonal labels die and I placed silver metallic pearls on it for an embellishment.  I also cut out with the layering circle dies, a scalloped circle. This was adhered to the inside edge of the card with dimensionals.  I placed a gray granite shimmer ribbon on top of it with a glue dot.  The circle allows the end of the top side of the card to tuck under it when it is opened to create the bay window.


Product List

Square Quilt Card

 I've gotten behind in posting on my blog, so today I am trying to get caught up.  My first post is presenting all the details of the square quilt card that I did.

I used the following products to make this card:

  • (12) 1-1/4" squares of the Heartwarming Hugs Designer Series Paper (3 squares of 4 different patterns)
  • (2) 5-1/4 X 4" of White cardstock and (1) Gold Foil Paper
  • 5-1/2" X 8-1/2" of Mossy Meadow cardstock
  • Layering Circle Dies
  • Gingerbread & Peppermint Acrylic Shapes
  • Delivering Cheer Stamp Set
  • Old Olive/Pretty Peacock Reversible Ribbon
  • Painted Texture 3D Embossing Folder
  • Multi-Purpose Glue
One White cardstock piece will go inside the Mossy Meadow cardstock base.  The second white piece I placed glue, going in a horizontal direction, with our Multi-Purpose glue, on one-third of the piece and placed the squares in a row, then proceeding with a second row, then a third row. I changed the order of the squares to give it a quilt pattern.  After this dried, I embossed the piece with our Painted Texture 3D Embossing Folder to give it the cozy quilt look.

I glued this piece on top of the gold foil piece.  I put my ribbon around those two pieces, looking at the card vertically.  I then adhered those pieces with the ribbon to the card base.

I used two sizes of the layering circles to make my sentiment label, stamping my sentiment from the Delivering Cheer Stamp Set.  I adhered those with Stampin' Dimensionals and added the acrylics for my embellishments. 

Click on the image(s) below to order your products to make this card.

Product List

Little Card, Big Message

I recently purchased the Big Little Things Photopolymer Stamp Set.  I purchased it with the idea of making children's cards with it, the...